Generating Environments
This is a more hands-on guide to generating environments using STRIPE-kit. Feel free to reference the actual module documentation for more details, this is a high level look at modelling environments.
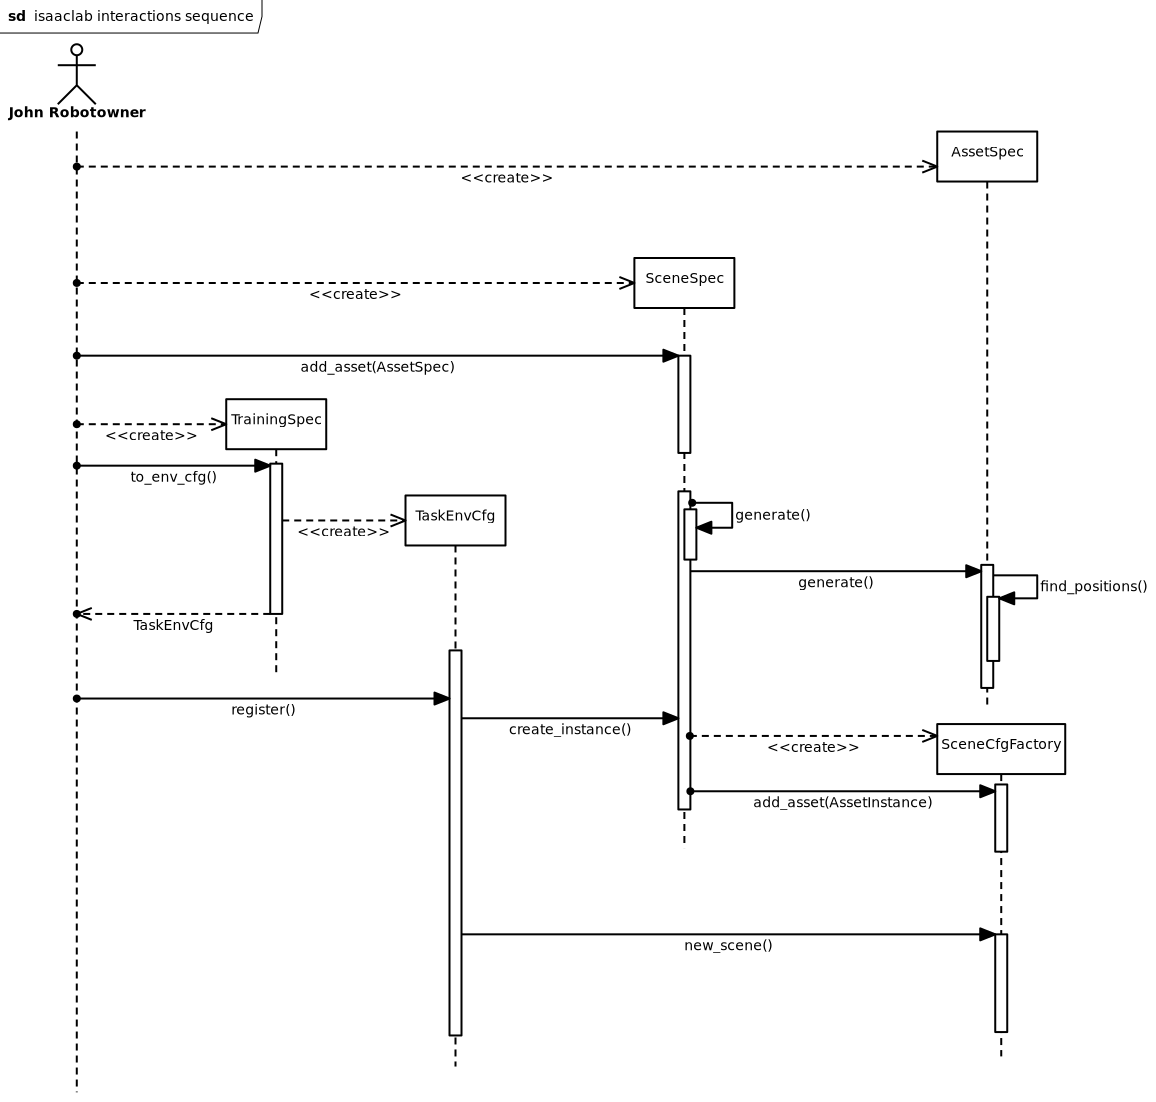
STRIPE-kit sequence diagram
At the really high level, STRIPE-kit models environments as a collection of assets, with a single terrain instance. Generally speaking, each asset has a type, which handles the asset’s placement and distribution. The terrain may be as complex as you need it, but at the end of the day, imagining it as a plane with a heightmap is a good starting point.
Asset types
In code, an asset type is represented by the stripe_kit.AssetSpec.
When you want to define a class of assets, say a tree, you create a new subclass
of stripe_kit.AssetSpec. You need to define the
stripe_kit.AssetSpec.generate() method, which given a certain
stripe_kit.TerrainInstance should return a list of
stripe_kit.AssetInstance. On the logical level, that method
is responsible for creating and distributing the assets in the scene. Thus, if
you need contextual generation, you need to have a shared asset type that places
the assets.
For example, you can create an asset type for all your trees in the scene. This will allow you then to implement the logic that places the trees in the scene, ensuring proper spacing and density. However, if you also need to have your bushes be properly spaced, thus making their placement dependant (contextual), you can create a larger asset type for all plants, which distributes them.
You should ideally keep the asset types as small as possible, but don’t be afraid to make them larger if need be. It’s only an antipattern to have everything in one asset type, if you don’t have a justification.
One trick you may utilise to pass data to the asset distribution algorithm,
is having a custom subclass of stripe_kit.TerrainInstance, that
has more attributes, thus allowing you to pass data.
Terrain
The terrain you envision may be as complex as you want it. At the end of the day, terrain is just a list of meshes, coupled with semantic tags. There’s nothing stopping you from making caves. Just consider the computational difficulties of placing assets in your terrain.
As mentioned previously, terrain is represented as
stripe_kit.TerrainInstance. In the normal pipeline, it is generated
by the stripe_kit.SceneSpec.generate() method, which you will need to
specify. The terrain should be bounded in both axes by a certain size. This
is expressed as the stripe_kit.TerrainInstance.size attribute.
Additionally, the terrain should have an explicit start point (may be 0,0 if you
are lazy as we are); expressed as the stripe_kit.TerrainInstance.origin.
Generally speaking, for terrain generation standard terrain procedural generation practice applies. 2d noise maps are great, but they are continuous. For non continuous noise maps, you will need 3d noise maps. Don’t forget to have your terrain be detailed at both high distances and low distances. If the terrain is too smooth, the potential navigation training will be too simple.
You should also decide, whether your terrain should have semantic classes or not. Since Isaac Lab doesn’t let you assign parts of a mesh different semantic classes, you should split your terrain into multiple meshes, each with its own set of semantic classes.
Scene
The complete scene definition is expressed as a stripe_kit.SceneSpec
instance. This class contains all the information needed to generate the scene,
including the terrain, assets, and any other elements. When you define your
scene, you should create a subclass, which implements the
stripe_kit.SceneSpec.generate() method. As mentioned previously, that
is where the terrain is generated.
You need not implement the stripe_kit.SceneSpec.create_instance()
method. By default it is implemented to call
stripe_kit.SceneSpec.generate() and add all assets in the
stripe_kit.SceneSpec.palette. If you need more complex generation,
feel free to override this method.
Feel free to have the asset type stripe_kit.SceneSpec.palette be
pre-filled by the constructor of your subclass. Apart from that attribute,
you also need to decide on the size of your scene, which functions
like the stripe_kit.TerrainInstance.size and should ideally
match. Additionally, your scene should have a light source, expressed
as a stripe_kit.LightSpec, stored in
stripe_kit.SceneSpec.light.
Pipeline
Ok so we have defined how the generation pipeline elements function. But how
does the sequence of events look like? First you define all the elements.
Create your stripe_kit.AssetSpec, add them to your
stripe_kit.SceneSpec’s palette. Then, simply running
the stripe_kit.SceneSpec.create_instance() method will return a
factory of scenes stripe_kit.SceneCfgFactory. This is so that you
can create multiple Isaac Lab scenes, out of a single generated scene instance.
Simply calling stripe_kit.SceneCfgFactory.get_scene() will return a
configclass, that Isaac Lab can use to initialize a scene.
Task
So far we have discussed environment generation. What about task definition?
Ideally, we want a single config that defines both and couples them together.
STRIPE-kit of course provides such a class:
stripe_kit.TrainingSpec. Once you have your
stripe_kit.SceneSpec, you can create the training specification off
of it, having provided the actual training config alongside. For details
on how the different training specs should be defined, have a look at
Isaac Lab documentation
Having created the training specification, in order to start RL training, you
first need to register it. This is accomplished by calling
stripe_kit.TrainingSpec.to_env_cfg(), which returns an object that has
a method register responsible for registering the
environment within gymnasium using gymnasium.register().
In order to train, you will need to create
a separate training script, that first registers the environment,
and then actually does the training, using a training framework of your choice.

STRIPE-kit class diagram